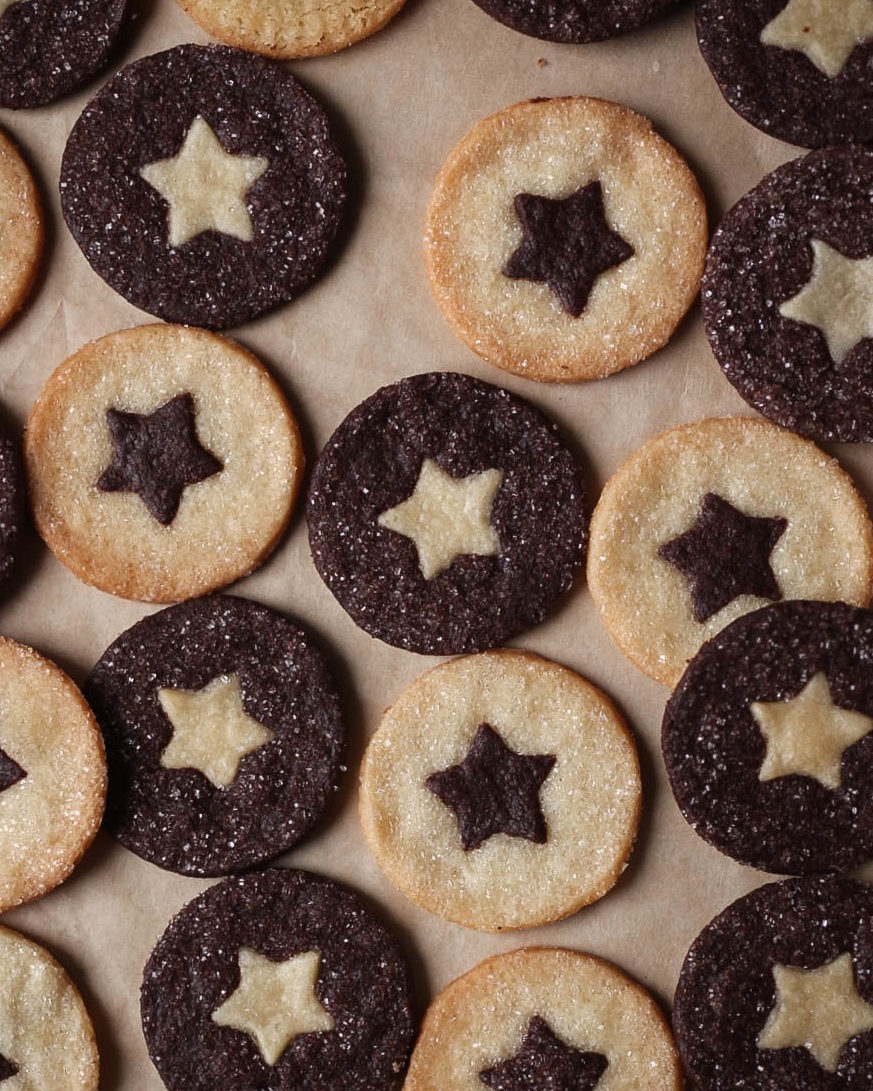
Chocolate+Vanilla Holiday Sablés
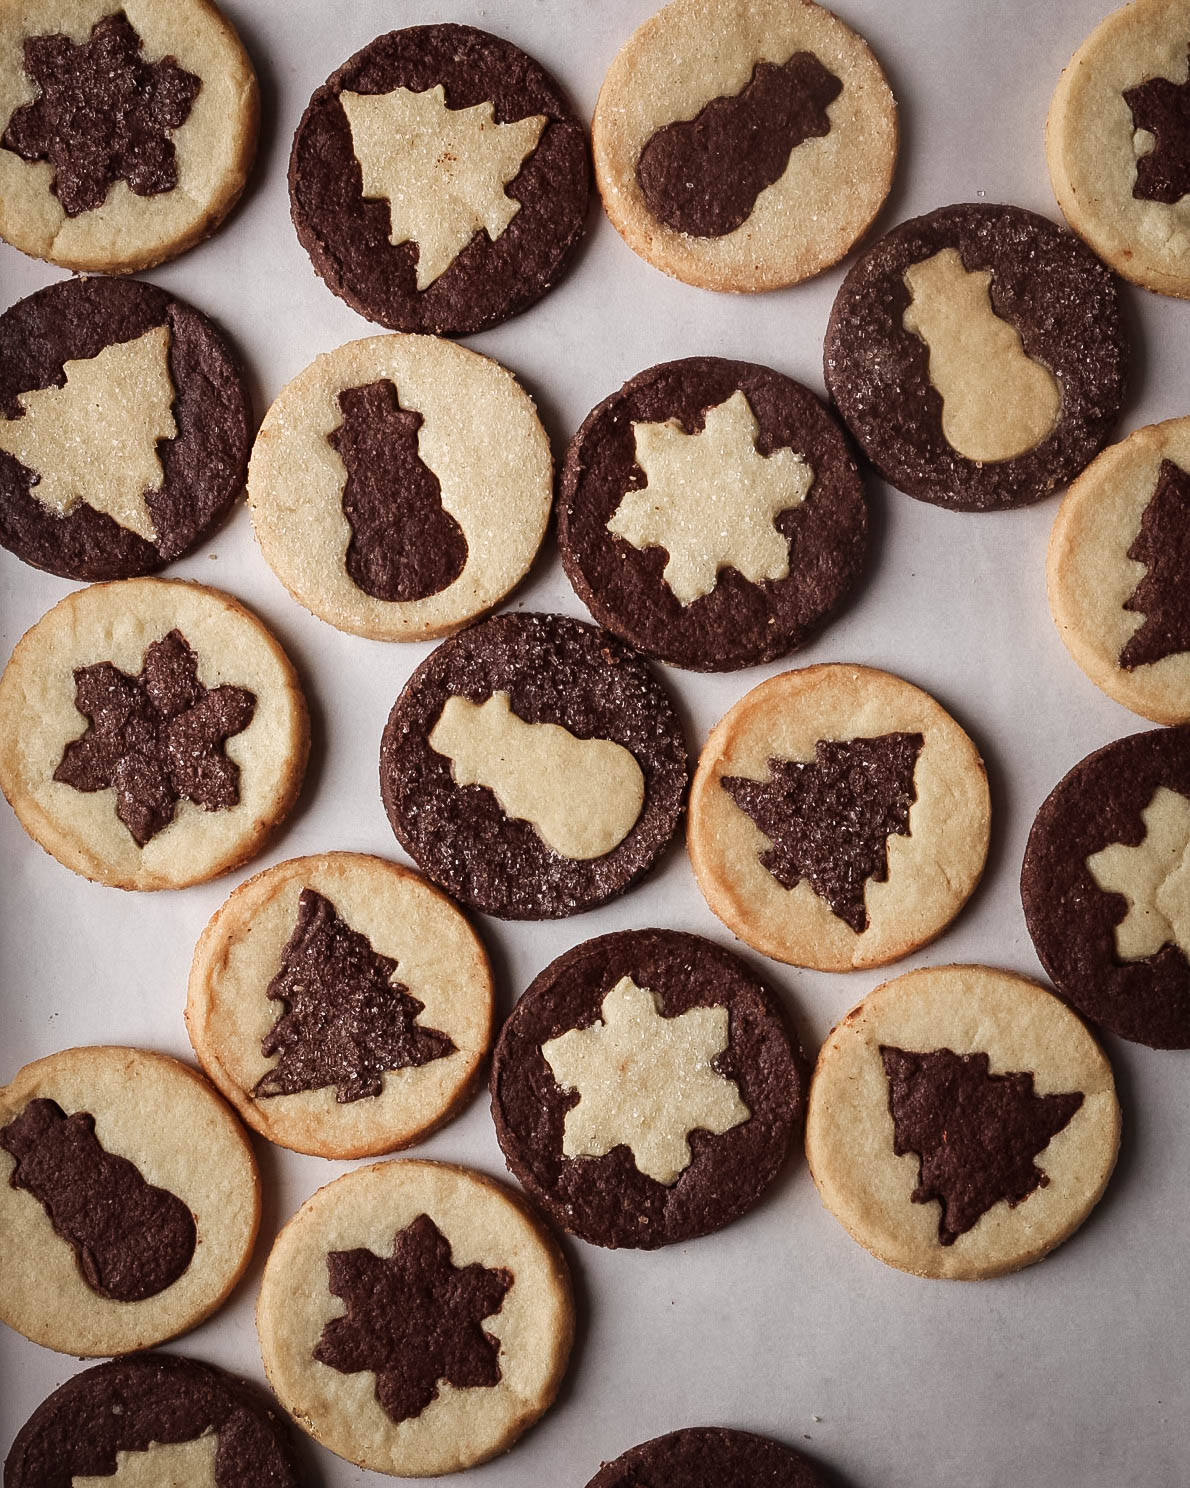
It’s been a long time since I’ve posted a new recipe, I know. My excuse is that I had a baby this past summer and have not had much time for baking, let alone blogging! But with family help and holiday festivities to motivate me, I managed to squeeze in some cookie baking, including these delightful sablés. The chocolate and vanilla cookies feature contrasting cutouts in festive shapes. To me, they’re the holy grail of holiday cookies: both pretty and absolutely delicious.
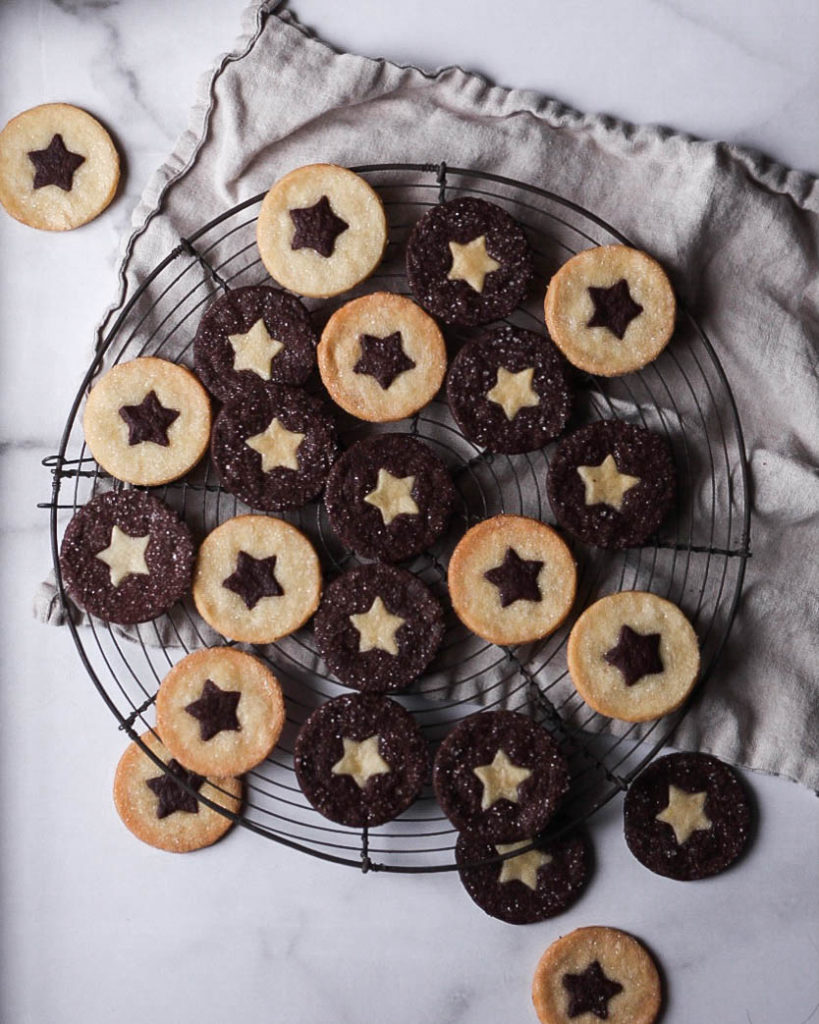
I cannot claim credit for the idea, which was inspired by some lovely Christmas-themed vanilla and cinnamon sablés posted on Instagram by fellow baking blogger @momentsofsugar. My recipe, in turn, is based on a couple recipes by baking goddess Dorie Greenspan, in her tome Dorie’s Cookies. Like many of Greenspan’s cookies, the sablés are deceptively plain. “Deceptively” is the key word here. As I discovered when I tweaked her vanilla and mint-chocolate sablés to create the cookies below, the flavor and texture are spectacular: buttery, crumbly, just-sweet-enough. They’re positively addictive. (I had to make a real effort to save enough for my cookie boxes!)
My biggest tip for making these is the same one you’ll find in many of my other posts: the freezer is your friend. Here, it allows you to quickly chill the cut-out cookies before reassembling them, which preserves the shapes of the cut-outs. The sanding sugar topping is optional but adds delicious crunch and definitely makes the sablés look more festive!
Chocolate + Vanilla Holiday Sablés
Buttery, crumbly, slightly sweet cookies with a crunchy sugar topping, based on classic sablé recipes in Dorie's Cookies, by Dorie Greenspan.
Ingredients
For the vanilla dough:
- 112 g unsalted butter at room temperature
- 50 g granulated sugar
- 15 g confectioners' sugar
- 1/4 tsp fine sea salt
- 1 large egg yolk
- 1 tsp vanilla extract
- 136 g all-purpose flour
For the chocolate dough:
- 130 g all-purpose flour
- 53 g dutch-process cocoa powder
- 112 g unsalted butter at room temperature
- 50 g granulated sugar
- 20 g confectioners' sugar
- 1/4 tsp fine sea salt
- 1 large egg yolk
- 1/2 tsp vanilla extract
To finish:
- sanding sugar or sparkling sugar
Instructions
Make the vanilla dough:
-
In a large bowl, using an electric hand mixer (or in a stand mixer using the paddle attachment), cream together the 112 g butter, 50 g granulated sugar, 15 g confectioners' sugar, and 1/4 teaspoon sea salt until smooth.
-
Scrape down the bowl, then add the egg yolk and and beat until well combined. Beat in the vanilla extract, and scrape down the bowl again.
-
Add the flour and mix at low speed until almost all the flour is incorporated. Turn off the mixer, and use a sturdy silicone spatula or wooden spoon to finish incorporating the flour.
-
Turn the dough out onto a large sheet of parchment, then cover with another parchment sheet and roll the dough out until it is about 1/4-inch thick. Place the parchment covered dough on a baking sheet and transfer to the refrigerator. Chill for at least 2 hours. (Alternatively, you can place the baking sheet in the freezer and freeze the dough for 1 hour.)
Make the chocolate dough:
-
Scrape out any remaining bits of vanilla dough from your large mixing bowl.
-
Into a separate, medium-sized bowl, sift together the 130 g flour and 53 g cocoa powder for the chocolate dough.
-
To the large mixing bowl, add the butter, sugars, and fine sea salt for the chocolate dough, and cream them together until smooth.
-
Scrape down the bowl, and then add the egg yolk, mixing it in until well combined. Mix in the vanilla extract, and then scrape down the bowl again.
-
Add the sifted flour and cocoa powder and mix the dough on low speed until the flour and cocoa are almost all incorporated. Turn off the mixer, and use your spatula or wooden spoon to fully incorporate the remaining bits of flour/cocoa.
-
As with the vanilla dough, roll out the chocolate dough between two sheets of parchment paper until about 1/4-inch thick. Transfer the rolled-out chocolate dough to the refrigerator or freezer. (You can stack it on top of the chilling vanilla dough.)
Prepare the pan(s) and preheat the oven:
-
Grease your muffin pan(s). Line Preheat the oven to 350 degrees F.
Cut out the cookies:
-
After the doughs have chilled, remove the vanilla dough from the refrigerator or freezer and peel off the top sheet of parchment paper. Use the larger round cookie cutter to cut out a cookie. Then, before removing the cookie from parchment, use the smaller cookie cutter to cut out a fun shape in middle of the round cookie. Use your offset spatula to gently lift the outer cookie and cut-out shape from the parchment, and transfer them separately to a fresh parchment-lined baking sheet. Continue cutting out cookies in this manner, transferring the outer cookies and cut-out shapes to the baking sheet. If desired, sprinkle the outer cookies (and/or cut-out shapes) with sanding/sparkling sugar, gently pressing the sugar to adhere. Transfer the baking sheet with the cut-out cookies to the freezer. Gather the scraps of vanilla dough into a ball, cover with the second sheet of parchment, and re-roll the scraps until you again have a 1/4-inch thick slab. Place this dough back in the fridge to re-chill.
-
Repeat this process with the chocolate dough. You can pull the baking sheet with the cut-out vanilla cookies from the freezer and transfer the chocolate cookies to that sheet, or place the chocolate cookies on a separate parchment-lined baking sheet. Either way, return all the cookie shapes to the freezer to chill for at least 15 minutes.
Assemble the cookies and bake them:
-
When the sparkling sugar-sprinkled cookies and cut-out shapes have frozen for at least 15 minutes, remove them from the freezer. Place the vanilla shapes in the cut-out openings of the chocolate cookies and vice versa. (For example, if you have cut out stars, place vanilla stars in the star-shaped cut-outs in the chocolate cookies, and chocolate stars in the star-shaped cut-outs of the vanilla cookies).
-
Transfer assembled cookies to the prepared muffin pan(s). If you only have one 12-cup standard muffin tin, for example, you'll have to bake batches of 12 cookies. Try to make sure that you have a mix of chocolate and vanilla cookies in each pan. Return any extra assembled cookies to the freezer.
-
When you've filled your muffin pan(s), place the pan(s) in the preheated oven and bake for 14-20 minutes, until the edges of the vanilla cookies are just beginning to turn golden. (The exact baking time will range based on the quirks of your oven, on the precise thickness of your cookies, and on their diameter.) Allow the cookies to cool in the muffin pans for at least 5-10 minutes, and then use a clean offset spatula or small butter knife to gently dislodge the cookies from the tins and transfer them to a wire rack to cool completely.
-
Re-grease the muffin pans if necessary, remove the additional assembled cookies from the freezer, and repeat.
Cut out, assemble, and bake more cookies with the extra dough:
-
While the first batches of cookies are baking, you can remove the rolled-out dough scraps from the fridge and cut out and assemble additional cookies. You will have slightly more chocolate dough than vanilla dough, so your last few cookies will be plain chocolate sablés. (I know, tragedy!) Follow the same freezing and baking process above for these last cookies.
-
The baked, cooled cookies should keep for five days at room temperature in an airtight container.
Recipe Notes
- The use of the muffin pan is specified in Dorie Greenspan’s original recipes–I think the purpose is to preserve the cookies’ round shape. But if you don’t have a muffin pan, you could try just baking the cookies on a parchment-lined baking sheet. They’ll be a bit more casual-looking.
- The size of your cookies and cut-outs will be limited by the size of the cups in your muffin pan. For a muffin pan with large-ish standard cups, I was able to use a 2.25-inch round cutter for the cookies. For many standard muffin pans, you may be limited to a 2-inch round cookie cutter. If you have a jumbo muffin pan, you may be able to use a 2.5-inch cutter.
- Greenspan’s original recipes call for rolling the cookies to exactly 1/4-inch thick. I now have nifty rolling pin guides that help me roll dough to an even thickness, but they are actually 3/16-inch, so my cookies this year were a bit thinner. Erring a bit above or below 1/4-inch thickness isn’t a problem, but the baking time will vary accordingly.
- The easiest way (for me) to tell if the cookies are done is to see that the edges of the vanilla rounds are starting to turn golden. Thus, I recommend including at least a couple vanilla ones in the mix when you bake a batch.
Thanks.